Skip to content

Breathing new life into painted surfaces, staining over paint offers a unique way to achieve a wood-like finish. This unconventional technique combines stain, sponges, and rags to produce captivating, often unexpected results. Rough-bristled chip brushes create broad strokes reminiscent of aged wood grain, while sponges and premium horse-hair brushes yield more delicate patterns. Whether you’re refreshing furniture or updating walls, this method opens up a world of design possibilities, allowing you to craft custom finishes that stand out. Learn how to master this innovative painting technique and transform your space with rich, textured surfaces that mimic the warmth and character of natural wood.
Read also: Does Air Conditioning Use Gas?
Can You Stain Over Paint?
Applying stain over paint offers a creative method to transform surfaces, resulting in a distinctive appearance that differs from traditional wood staining. This technique produces an artistic, faux wood-grain effect that can revitalize painted items. The final look is influenced by the existing paint’s color and sheen, as well as the type of stain chosen.

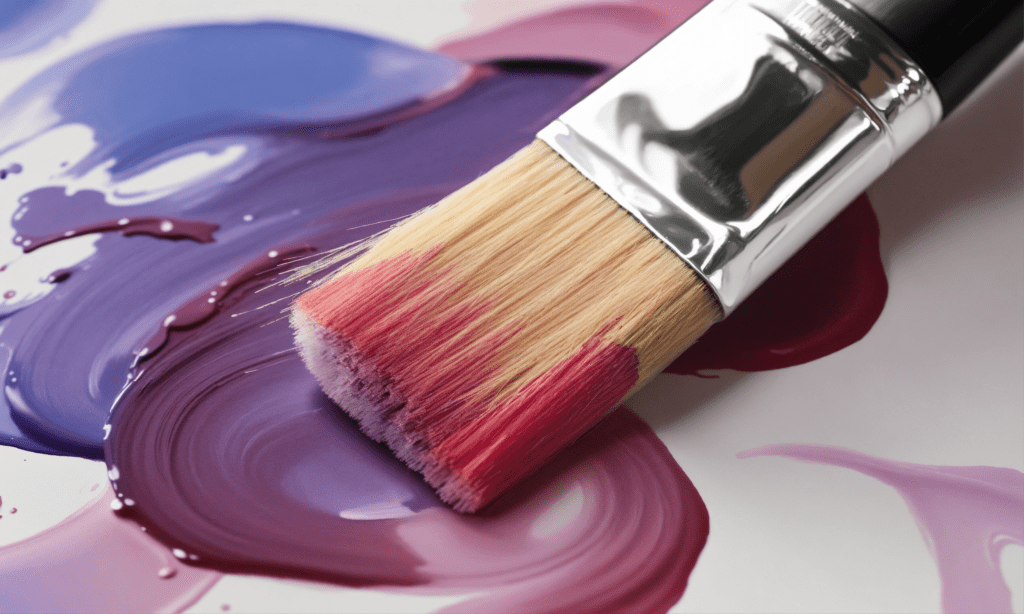
The outcome of staining over paint is often characterized by a streaky, glazed appearance with rich, dark undertones. This process creates a finish that resembles a lacquered surface, adding depth and character to the object. It’s worth noting that this method doesn’t replicate the authentic look of stained wood grain. To achieve a genuine wood-stained appearance, it’s necessary to completely remove the existing paint before applying the stain.
However, the stain-over-paint technique presents an intriguing alternative for those looking to refresh painted surfaces without the time-consuming task of stripping paint. The interaction between the stain and the underlying paint layer creates a unique visual effect. Rather than simply covering the paint, the stain interacts with it, allowing some of the base color to show through while adding new dimensions of color and texture.
This interplay results in a visually engaging surface that combines elements of both painting and staining techniques. The final product often has a stylized, artistic quality that can enhance the aesthetic appeal of furniture, decorative objects, or architectural elements. By carefully selecting the stain color and application method, you can achieve a wide range of effects, from subtle color shifts to dramatic transformations.
When to Stain Over Paint
Staining over paint can be an effective technique for transforming various wooden objects, particularly when you want to give new life to older pieces or create a unique aesthetic. This method is especially useful for smaller projects where you aim to achieve a specific look or enhance the visual appeal of an item without completely stripping away its existing paint.
One ideal scenario for staining over paint is when refurbishing old furniture. For instance, you might have a thrift store find that doesn’t quite match your decor. Instead of completely repainting it, applying a stain over the existing paint can create a weathered, antique appearance that adds character to the piece. This technique works particularly well on items like nightstands, side tables, or bookshelves, allowing you to transform them into pieces that look like they’ve been passed down through generations.
Another opportune time to consider staining over paint is when updating children’s furniture for adult use. As children grow and their tastes change, you might find yourself with painted dressers or desks that no longer suit their needs. Rather than discarding these pieces, staining over the paint can give them a more sophisticated look, making them suitable for guest rooms or home offices. The stain can help mask bright colors or playful designs while imparting a more mature, refined appearance.
Doors and woodwork within your home can also benefit from this technique. If you have painted trim or doors that you’d like to update without the hassle of completely stripping the paint, staining over them can be an excellent solution. This approach can help you achieve a wood-like appearance or add depth and texture to otherwise flat-looking surfaces.
Small accent pieces are perfect candidates for staining over paint. Consider applying this technique to painted picture frames, small decorative tables, or even wooden boxes. By using a dark stain over a lighter painted surface, you can create striking contrasts and interesting visual effects that mimic natural wood grain patterns.
It’s worth noting that staining over paint is most effective when the existing paint is in good condition and firmly adhered to the surface. If the paint is chipping, peeling, or otherwise damaged, it’s better to remove it entirely before applying any new finish. The type of paint also matters – oil-based paints tend to accept stains better than latex paints.
Before committing to staining over paint on a large scale, it’s wise to test the technique on a small, inconspicuous area. This will help you gauge how the stain interacts with the existing paint and determine if the result aligns with your vision for the project.
Safety Precautions When Staining
When undertaking a staining project, it’s crucial to prioritize safety. The chemicals used in stains can emit strong odors and potentially harmful fumes, making proper ventilation a necessity rather than an option.
Ideally, staining should be done in a space with ample air circulation. A garage with an open door provides an excellent environment for such projects. The open door allows fresh air to flow in and helps disperse any fumes that may accumulate during the staining process. This setup strikes a balance between protecting your work from the elements and ensuring you’re not exposed to concentrated fumes.
If a garage isn’t available, a covered patio can serve as an alternative workspace. The key is to have overhead protection from potential rain or direct sunlight while still allowing for unrestricted airflow. This outdoor setting naturally provides the ventilation needed to dissipate odors and fumes effectively.
It’s important to understand that the smell associated with stains isn’t just unpleasant; it can pose health risks if inhaled in high concentrations or over extended periods. Some individuals may experience headaches, dizziness, or nausea when exposed to these fumes. In more severe cases, prolonged exposure could lead to respiratory issues.
To further enhance safety, consider wearing a respirator mask designed for use with chemical vapors. This provides an additional layer of protection against inhaling harmful fumes. Protective gloves are also recommended to prevent skin contact with the stain.
Time your staining project wisely. Choose a day with mild weather conditions – not too hot or humid – as extreme temperatures can affect both the staining process and the intensity of fumes. If possible, plan to do the work when other household members, especially children and pets, can be away from the area.
After completing the staining process, allow the item to dry thoroughly in the well-ventilated area before bringing it indoors. This extra precaution ensures that any lingering odors or emissions have dissipated before the piece is reintroduced to living spaces.
By taking these safety measures seriously, you can enjoy the creative process of staining while protecting your health and well-being. Remember, a successful project isn’t just about achieving the desired aesthetic; it’s also about maintaining a safe environment throughout the process.
What You’ll Need
Preparing for your staining project? Gather the essential equipment and materials to ensure a smooth and successful process. You’ll need sandpaper, stain application tools like brushes or sponges, a drop cloth, eye protection, gloves, and clean rags or tack cloth. When it comes to materials, you’ll require either oil-based or water-based gel stain, along with your painted work surface and some plastic sandwich bags.

Equipment / Tools
To tackle your staining project, you’ll need a variety of equipment and tools. Sandpaper is essential for preparing the surface before applying the stain. Stain application devices like natural or synthetic bristle brushes, foam sponge brushes, cotton cloths, or roller frames with covers will help you evenly distribute the stain. Don’t forget a drop cloth to protect your work area, as well as eye protection and waterproof gloves like latex or nitrile. Keep some clean rags or tack cloth on hand for cleanup and touch-ups. An indelible marker can also come in handy for labeling your work.
Materials
The key materials you’ll need for your staining project are the stain itself and the painted work surface. You can choose from oil-based or water-based gel stains, depending on your preferences and the specific requirements of your project. Make sure to have the painted work material ready, and consider keeping some plastic sandwich bags on hand for storing any leftover stain.
Instructions

Prepare the Work Area
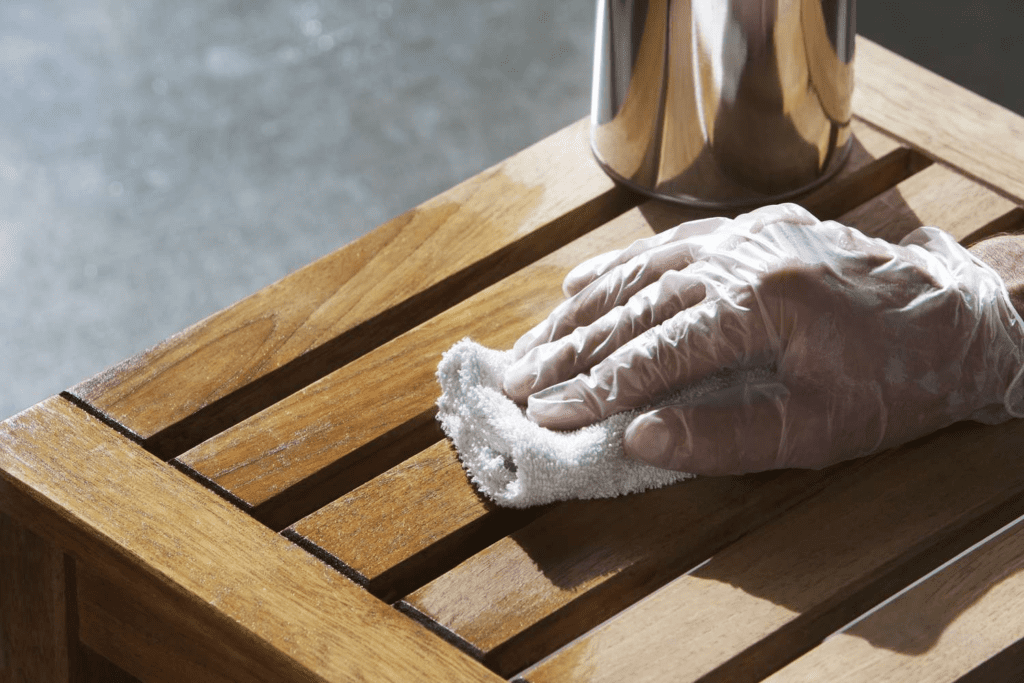
Ensuring a clean and safe workspace is crucial before embarking on your staining project. Begin by laying a drop cloth under the item, extending it a few feet beyond to catch any potential stain splatters. This will help protect your surroundings and make the clean-up process much easier. Next, don a pair of latex or nitrile gloves, as wood stain can be notoriously difficult to remove from your hands.
Remove Accessories
If you’re working on a piece of furniture, such as a dresser or nightstand, it’s important to unscrew and remove any hardware, hinges, or other items that won’t be stained. Bag these items and their corresponding screws, labeling the bag with an indelible marker, and set them aside in a safe place. This will ensure a smooth and efficient staining process.
Test the Painted Surface
Before diving into the staining process, it’s crucial to conduct a test on a remote, inconspicuous area of the painted surface. This will allow you to assess how the paint’s sheen and overall condition will affect the outcome of the stain. It’s essential to understand these factors to achieve the desired result.
Sand the Surface
Lightly sanding the painted surface is a necessary step in the staining process. The goal is to rough up the paint, not to remove it entirely. This will help the stain adhere better and create a more natural, wood-like appearance.
Clean the Surface
After sanding, use a clean cloth or a tack cloth to thoroughly clean the surface. Gently rub with the tack cloth to avoid embedding the surface with beeswax, which could interfere with the stain’s absorption.
Mix the Stain
Carefully stir the stain with a clean wooden stirring stick. As the stain contains pigments, it’s important to ensure it’s thoroughly mixed to achieve consistent coverage. Allow the stain to sit for approximately 15 minutes before use, as bubbles may form during the mixing process.
Apply Stain to the Paint
When applying the stain, dip just the tip of the brush bristles into the mixture. Transfer the brush to the painted surface, starting at one edge, and gently brush the stain onto the area. If you’re aiming for a darker stain effect, apply multiple thin layers instead of a single thick layer. Remember, a little stain goes a long way, especially on less absorbent painted surfaces.
Let the Stain Dry
Stained surfaces typically dry to the touch within two hours. Allow for at least two hours between coats if you’re applying additional layers. Once you’ve applied the final coat, let it dry overnight before reinstalling any hardware or using the piece.
How to Accentuate the Faux Wood-Grain Look

To achieve a more natural, wood-grain-like appearance, you can use a rough-bristled, inexpensive chip brush to create a heavy, streaked effect. Additionally, you can layer two different shades of stain, one darker than the other, and move the brush primarily in the same direction to mimic wood grain. You can also occasionally create long, narrow ovals with the brush to simulate wood knots.
How to Achieve a Smooth Look and Feel
For a smooth, even stained finish, use a staining pad or a high-quality natural bristle paintbrush. To ensure a physically smooth surface, work through the sandpaper grits from lower to higher, such as from #120 to #150, and ending with a #180 grit.
Stain Over Paint: Troubleshooting
Keep in mind that the paint’s sheen can affect the stain’s absorption and final appearance. Glossier paints have a lower porosity, which can cause the stain to slide off more easily, resulting in a lighter color. In contrast, flat sheen paints have greater porosity and will absorb more stain, leading to a darker finish.
Additionally, be aware that silicone caulking or certain types of glues can completely shed the stain, resulting in light spots. Similarly, areas of unsealed wood putty or wood filler will readily absorb the stain, creating noticeable dark spots.
When working with oil-based stains, use only natural applicators like horse hair brushes or cotton pads. For water-based stains, you can use either natural or synthetic applicators, such as foam sponge brushes.
Conclusion
Staining over painted surfaces requires careful preparation and attention to detail, but the results can be truly remarkable. By following the steps outlined in this guide, you can transform your painted furniture or surfaces into beautifully stained pieces that exude a rich, natural wood-like appearance.
Remember, the key to success lies in properly preparing the surface, mixing the stain thoroughly, and applying it with the right techniques. Whether you’re aiming for a smooth, even finish or a more textured, faux wood-grain look, the methods provided in this article will equip you with the knowledge to achieve your desired outcome. With a little patience and practice, you’ll be able to breathe new life into your painted furnishings and create a stunning, personalized aesthetic for your space.
FAQs
Can I put a stain over paint?
If the painted surface that lies beneath the solid stained coating ever decides to “peel”, it will do so and take the solid stain coating with it. But if the painted surface remains intact, the solid stain will stay on the painted surface for years to come without any detrimental effect.
Will stain cover up paint?
For true stained wood, you will need to first strip off all of the paint, then apply the stain. Stain over paint instead produces a stylized, faux wood grain look. Depending on the color and sheen of the paint and the type of stain, the result has a streaky, glazed, lacquered look with rich, dark undertones.
What happens if you add stain to paint?
Stain and paint can be mixed safely to achieve your desired color. For successful results, mix oil-based stain only with oil-based paint and water-based stain only with water-based paint. You can also mix two colors of stain together to achieve the tint that you wish.